Before I explain you something about this DIY, I have to tell you about my home.
I live in a 4 bedroom apartment with my boyfriend. Renting in Holland is pretty expensive, especially if you’re a student like me. So living in a big house like ours is not very common. The reason why we can afford this apartment, is because it’s temporarily. Our apartment is going to be torn down to create space for new apartments. We can live here fairly cheap because we don’t know when we have to move out.
This situation is ideal for students like me, it has the downside of not knowing when you have to move out, but it has the plus side that I can live near the city centre and live in a big apartment.
Because this house is going to be torn down, we can do anything we want with it. We don’t want to spend to much money on it though, because we don’t know how long we can enjoy our current house.
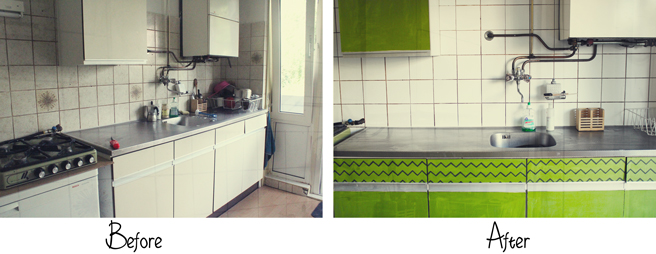
I did spend a lot of hours restyling the house in the cheapest ways possible and one of those restyling projects was the kitchen. Below you can see the before and after pictures.
The Tutorials:
The entire kitchen was beige and that made it look kinda unclean and old. So I really wanted to change that. However, the cabinets where unpaintable and tile paint is very expensive.
So I came up with two ways to transform the kitchen:
1: Cover the tiles with white adhesive plastic.
2. Cover the cabinets with fabric, using mod podge.
This was all very experimental and I had no idea if it would work out. In the end the tiles turned out great, but the cabinets where not what I expected. I thought that the mod podge would stiffen the fabric and make it glossy, but it didn’t. And I found out that you have to apply the mod podge very evenly, or else you’ll get uneven stripes in the color of the fabric. It is a great inexpensive way to spice up the cabinets, but you shouldn’t restyle your cabinets this way if you want them to stay like that for very long. But it is a great way to temporarily change the look of your kitchen.
Here’s how:
Kitchen Tiles:
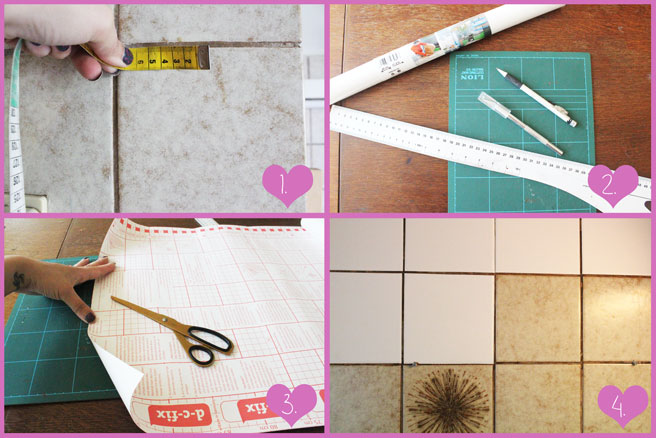
1. Measure the tiles in your kitchen and clean them thourougly.
2. Take the adhesive plastic, and the cutting supplies.
3. Cut the adhesive plastic in the same size as your tiles.
4. Apply the tile sized adhesive plastic on your kitchen tiles.
Kitchen Cabinets:
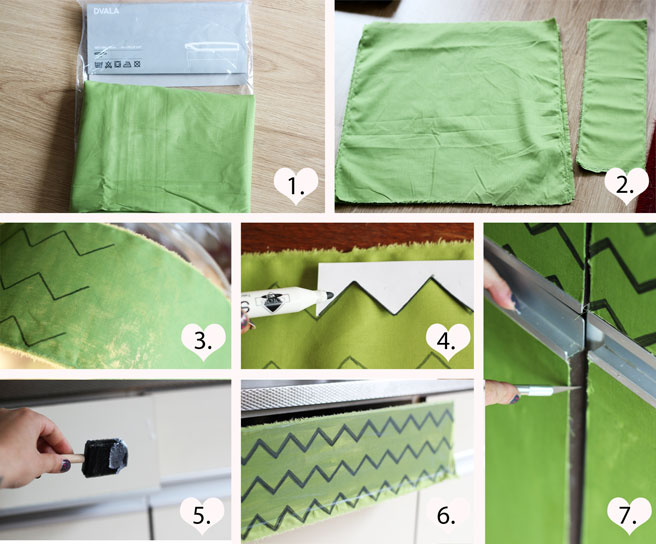
1. Get your fabric. I used a bedspread from Ikea.
2. Cut the fabric in the sizes of your cabinets and drawers.
3. Get a fabric marker and draw the shape you like on the fabric.
4. Trace the same shape on the rest of the fabric.
5. Apply a layer of mod podge on your cleaned kitchen cabinets and drawers. Make sure that there’s an even layer as a base!
6. Apply the fabric onto the drawers and cabinets. Let it dry. After it dryed apply a second layer of mod lodge. Make sure that you apply the mod podge in strokes and that there’s an even layer.
7. Cut of the excessive fabric.
Alle done!

4 comments
Wow! Great transformation!! Your kitchen turned out really great! I love the new tiles and cabinets!!!
Have a nice evening!!
Thank you! It took me a while to transform it, but I am so happy that I did!
xx Lana
Thanks for this i might actually have to use it since im looking for an apartment to rent myself. Also, absolutely love your blog.
by the way, instead of using fabric, what would be a better material (maybe something that would harden better?) and ive never used modge podge before soo im worried if it would leave any marks on the cabinets?
thanks :)
Hi!
I don’t know how the cabinets will look when you remove the mod lodge again. But you can try to use adhesive plastic. You have it in all these different prints and materials. I used it for the tiles, but you can also use it for your cabinets. And I think that it won’t leave any marks on the cabinets.
Good luck!xx